Vendors
This topic describes how to create and manage vendors in Nakisa Facilities Management Suite. Vendors are third-party service providers who perform facility-related work. You can create vendors, assign contacts, associate premises, and manage vendor-related documentation.
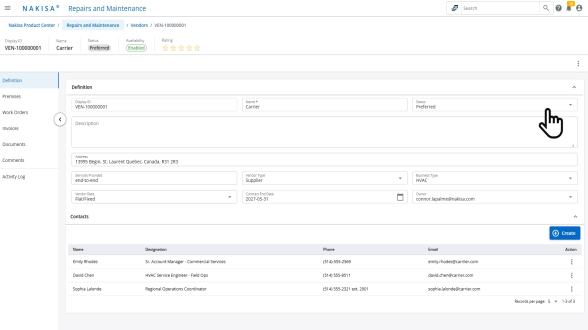
To create a vendor:
- From the Main Menu, click Admin > Vendors.
- On the Vendor Listing page, click Create.
- Enter the required information:
- Vendor Name
- Vendor Type
- Business Type
- Click Create to open the Vendor Definition page.
- Enter any additional required details.
- When the vendor information is complete and approved, change the Status to indicate the vendor is active and eligible to be assigned work.
Once the vendor is created, you can add contacts who serve as points of communication.
To add a contact:
- In the Contacts section of the Vendor Definition page, click Create.
- Enter the contact details:
- Contact Name
- Designation
- Phone Number
- Email Address
- Click Create. The new contact appears in the list.
You can view a vendor’s Work Order and Invoice history from the corresponding tabs. These sections may be empty for new vendors. You can also assign the vendor to a premises to define where the vendor provides services.
To assign a premises:
- Click on the Premises tab.
- Click Attach.
- Search for and select the premises to associate with the vendor.
- Click Attach. The selected premises is added to the vendor’s list.
You can also attach documents related to the vendor, such as agreements, certifications, and insurance.
To attach documents:
- Go to the Documents tab.
- Click Attach.
- Enter the document details:
- Name
- Description
- Type
- Status
- Start Date (optional)
- End Date (optional)
- Upload the file using the File field.
- Click Save. The document appears in the document list.

|
Nakisa Facilities Management Suite 2025.R2 © 2025
|
Nakisa Inc. All rights reserved worldwide. |