Create and Apply Tags
Tags are scenario-specific and customizable. You can create as many tags as needed, each with a name and color to help you quickly identify them in the org chart.
Best practices:
- Use distinct, descriptive tag names that align with your scenario objectives.
- Choose contrasting tag colors for easier identification in complex charts.
- Use filtering before exporting or sharing views to emphasize priority roles.
These tags are available in custom dashboards and in scenario directories (if you add the Tags field) to help you identify and filter your data.
Create a New Tag
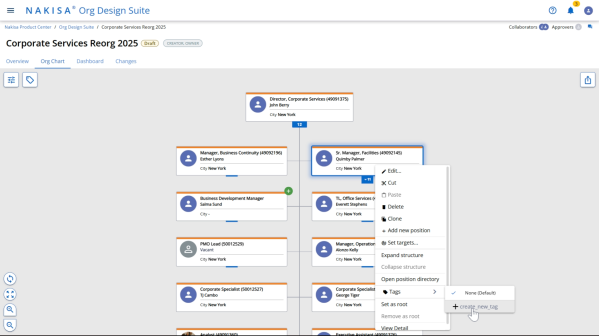
- Right-click any position or org unit node in the Org Chart.
- From the context menu, select Tags > Create New Tag.
- In the tag creation form:
- Tag Label: Enter a meaningful label (e.g., Critical Position, Future Hire, To Be Eliminated).
- Color: Choose a color that distinguishes the tag visually.
- Click Add.
The new tag is added to the Tag Menu and is now available for use throughout the scenario.
There is no limit to the number of tags you can create.
Apply Tags to Positions or Org Units
After creating your tags:
- Right-click one or multiple nodes in the org chart.
- Select Assign Tag from the context menu.
- Choose one or more tags from the available list.
- The tag(s) will appear on the box in the org chart.
Repeat this process to assign tags across multiple positions or org units.
Filter the Org Chart by Tag
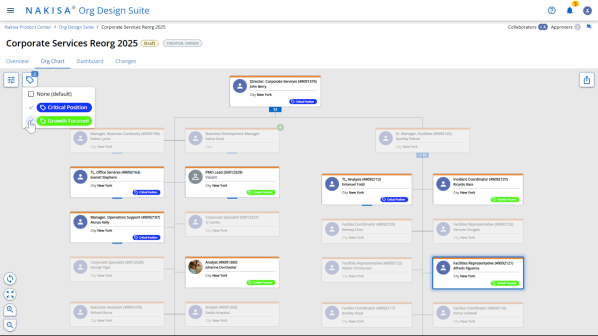
To isolate specific tagged positions:
- Click the Tag Filter icon in the top toolbar.
- In the tag filter panel, select one or more tags to display.
- The org chart view updates:
- Tagged boxes remain visible.
- All other boxes are dimmed, making it easier to focus.
Use filtering to focus your analysis, identify trends, or prepare for team discussions.

|
Nakisa Strategic Org Design 2026.R1 © 2026 |
Nakisa Inc. All rights reserved worldwide. |